Split-Step Timing: The Faster Footwork Fix Every Player Needs
One small hop can change your entire match. Learn how to time the split step so you start faster, defend smarter, and attack earlier. Detailed drills, simple cues, and a 14‑day plan you can use today.

The tiny hop that unlocks faster tennis
If you watch a rally in slow motion, a curious thing happens right before every player takes off for the next ball. There is a light hop, both heels unweight, knees flex, and then the feet reconnect with the court as the opponent strikes. That moment is the split step. It is not decoration. It is the trigger that turns reading the play into real movement. Get it right and your first step feels explosive. Get it wrong and you will always feel late, no matter how hard you sprint.
This article breaks the split step into simple parts you can feel immediately. You will learn what it is, when to time it, how high to jump, where to land, and how to drill it until it is automatic. You will also get a two-week plan that fits around regular practice and match play.
What the split step actually does
Think of your body like a loaded spring. When you land from a small hop with knees slightly bent and weight on the balls of your feet, the muscles and tendons around your ankles and knees store elastic energy. This is called the stretch-shortening cycle. It is a natural reflex that helps you push off faster without feeling like you are muscling the court. The split step times that stored energy to the exact moment you need to choose left, right, forward, or back.
Here is the chain of events:
- You read your opponent’s swing path and contact point.
- You lift lightly and separate your feet a touch during the hop.
- You land balanced as the ball leaves your opponent’s strings.
- Your first step fires in the correct direction, with less delay and less wasted motion.
When this sequence is dialed in, everything down the line improves: defense on wide balls, early preparation on neutral balls, and faster transitions when you attack.
Timing: the only part that really matters
Players often ask, should I go higher or wider, or should I land on my toes? These details matter only after you nail the timing. The rule is simple: land just as your opponent makes contact. If you land noticeably before contact, you will sink and stall. If you land after contact, the ball is already flying and you will chase.
Practical cues you can use today:
- Watch the opponent’s chest and racquet hand as the ball arrives. When the chest turns and the racquet accelerates forward, begin your small hop.
- Aim to touch down as the strings meet the ball. Think soft and springy, not hard and loud.
- If you are late frequently, begin the hop earlier in the opponent’s forward swing. If you are early and feel stuck, delay your hop by a fraction of a beat.
A simple home test: put your phone in slow motion and film three rallies from the side fence. You should see your shoes reconnect with the court at or just before the opponent’s contact. If you land and then wait, you are early. If you are airborne as the ball leaves their strings, you are late.
How high and how wide should the hop be
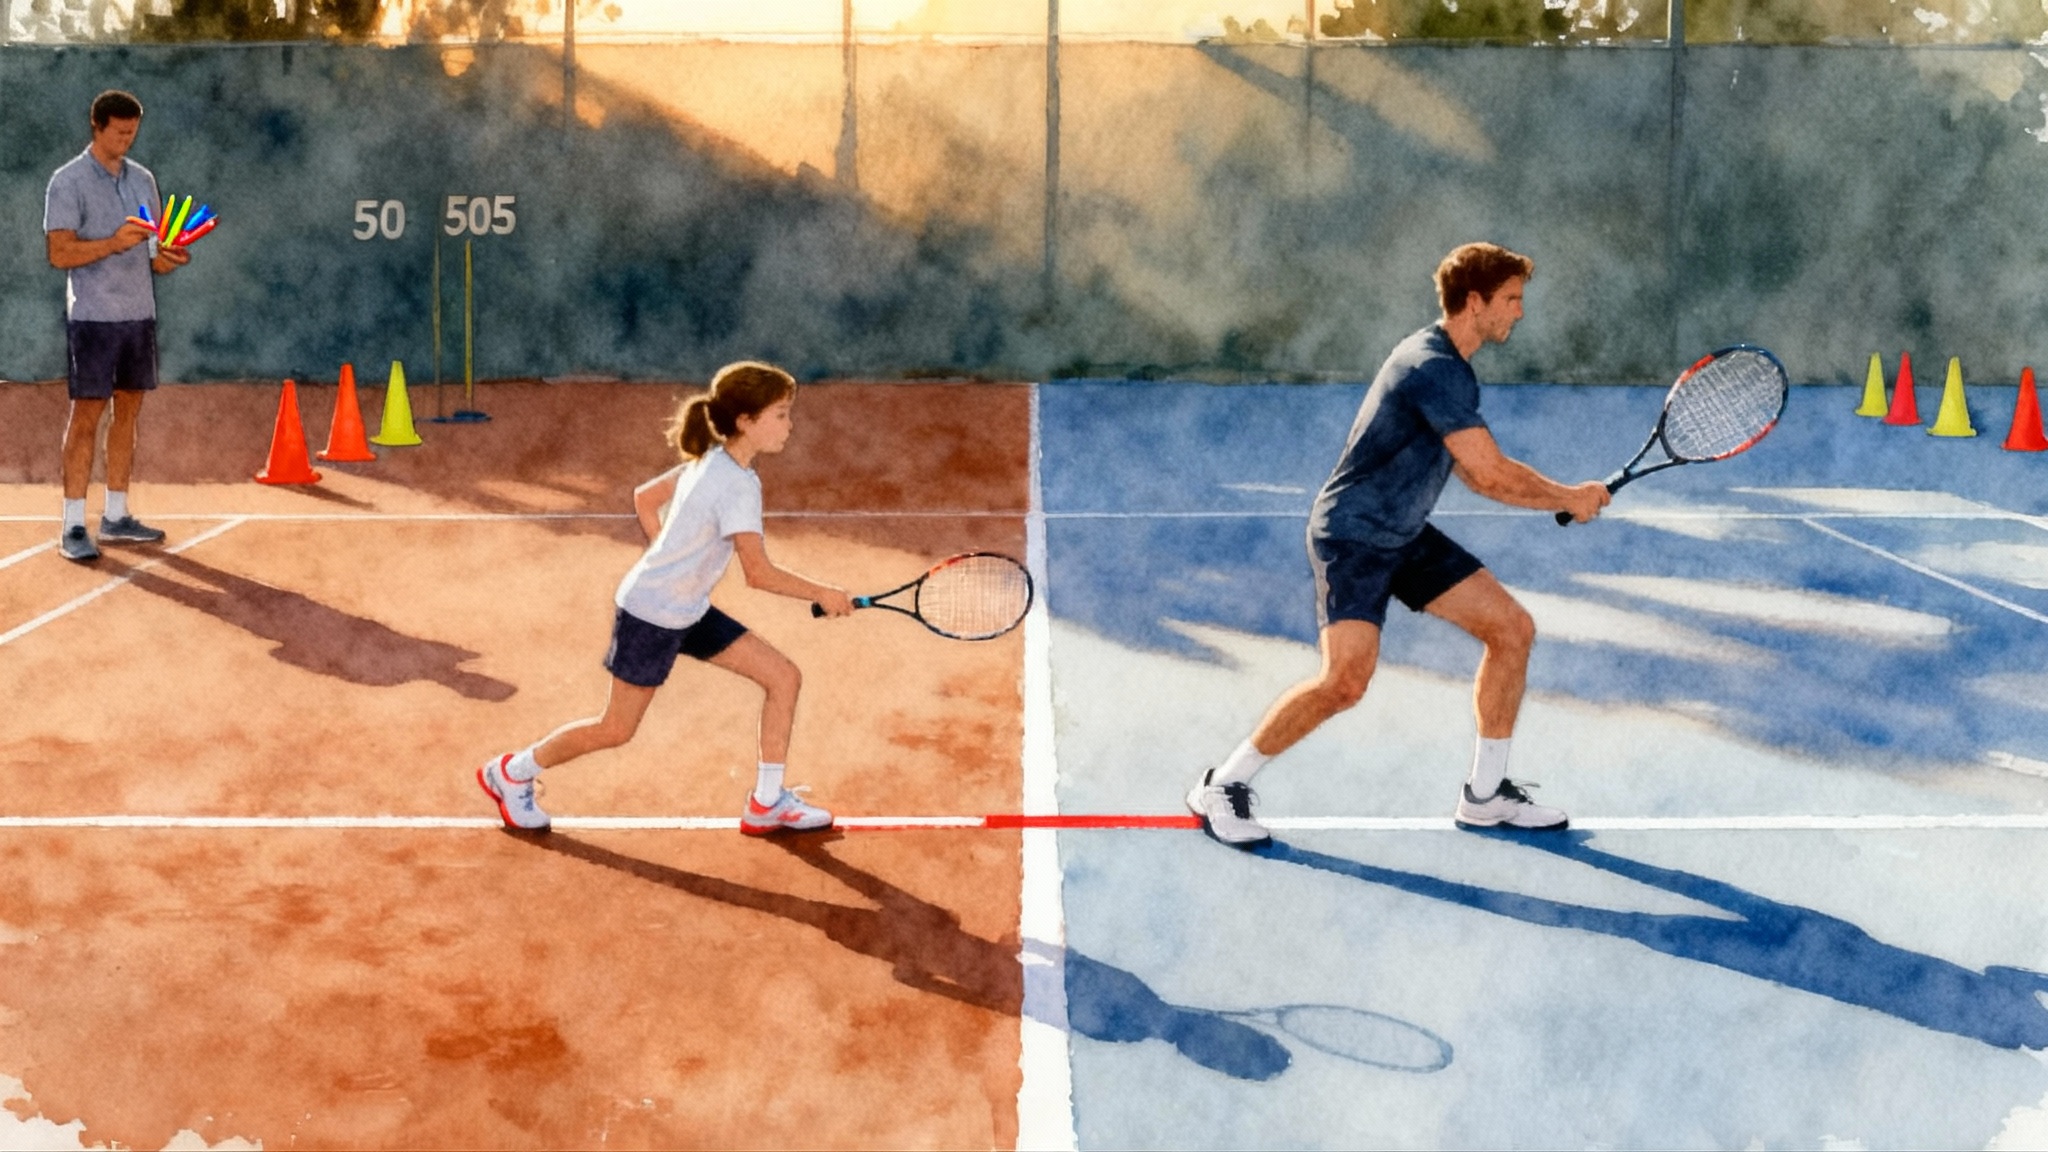
The split step is not a jump for height. It is a float for timing. A small lift is enough to unweight your feet and reset your balance. Most players benefit from a hop no higher than the thickness of a racquet frame. Higher hops waste time in the air. Wide feet also are not the point. Land slightly wider than shoulder width, with knees bent enough that you can push in any direction without re-squatting.
Checklist for landing:
- Heels light, pressure under the balls of both feet
- Knees flexed but not collapsed
- Hips level, chest quiet, eyes steady
- Racquet head already rising to your ready position
Where to place your feet
Your landing should mirror your opponent’s options. If your opponent is late and reaching on the run, bias your landing toward the open court they can still reach. If they are balanced and inside the baseline, expect more angles and be ready to push diagonally. The more you connect your landing spot to the opponent’s likely shot, the less you will be surprised.
Practical example: return of serve. On a second serve, many players step in and split slightly inside the baseline so they can attack either wing. On a heavy first serve, most players split just behind the baseline for a deeper first step. Same move, different location, identical goal: land balanced as the ball leaves the server’s strings. For deeper tactics, see our return of serve blueprint.
The three biggest split-step mistakes
-
The statue: landing too early
You hop, land, and sink while your opponent is still swinging. By the time contact happens, your legs are already relaxed. Fix it by delaying your hop until the opponent’s racquet begins to drive forward. Say the cue in your head: up on swing, down on hit. -
The parachute: jumping too high
A big hop feels athletic but steals time. If you hear a loud thud, you are landing too hard. Soften the hop. Think whisper, not stomp. Reduce the height until you float rather than fall. -
The crab: feet too wide
If you land in an exaggerated sumo stance, you must shift back to center before moving. Land slightly wider than shoulders. Place the inside edge of both shoes ready to push, with no extra shuffle before your first step.
How pros make it look effortless
Watch players known for defense and counterpunching. Novak Djokovic often lands his split step lightly, almost invisible, then fires the first step without any wasted bounce. Iga Swiatek shows the same quiet landing, followed by a fast directional push. What they share is not height or flash. It is precise timing and a relaxed upper body. The arms do not flail. The head does not bob. Their landings look smooth because they manage tension. You can copy that by keeping your grip pressure at a five out of ten during the hop, then tightening only as you set the racquet for the stroke. If your first step still feels sticky, layer in this 6-week change of direction plan.
Drills you can do today
You do not need a ball machine to improve your split step. You need repetition, a simple cue, and a little video.
- Shadow split and go
- Stand on the baseline facing the net. Imagine the opponent’s swing.
- Say out loud: up on swing, down on hit, first step.
- Land and push diagonally to your forehand sideline, then backpedal to center.
- Repeat to the backhand. Ten reps each side, two sets.
- Coach clap reaction
- Partner or coach stands on the opposite baseline.
- You face them in ready position. They clap once to mimic contact.
- You time your hop to land precisely on the clap, then explode left or right based on their finger point.
- Focus on soft landing and instant push. Three rounds of twenty claps.
- Serve and split return
- Server hits a mix of first and second serves.
- You adjust your starting position and split location accordingly.
- Film from behind. Aim for the same rule: land as the ball leaves their strings. Review every ten serves.
- Ball drop cue
- Coach stands on service line with a ball held at shoulder height.
- When the ball is released, you begin your hop.
- You must touch down as the ball hits the ground. This trains visual trigger to landing. Two sets of fifteen drops.
- Two-ball color call
- Coach feeds a ball and simultaneously displays a colored cone.
- Land your split on contact and call the color aloud as you take your first step.
- This pairs vision, voice, and movement so timing survives pressure.
Make it automatic with a 14-day plan
Consistency builds from small daily touches. Here is a two-week plan that fits around normal practice. It totals about fifteen minutes a day on non-practice days and ten minutes before or after training on court days.
Days 1 to 3: feel and film
- Five minutes of shadow split and go. Record one minute on your phone in slow motion.
- Ten minutes of coach clap reaction, or use a metronome app set to a comfortable tempo and clap with it manually.
- Action check: on video, do you land as the sound or clap happens? If not, adjust the start of your hop.
Days 4 to 6: add direction
- Ten minutes of two-ball color call, alternating sides.
- Ten minutes of serve and split return at 70 percent intensity.
- Action check: if your first step is hesitant, simplify. Reduce the hop height and focus on the cue down on hit.
Days 7 to 10: apply under speed
- Before practice matches, take two minutes per changeover to do six shadow reps on the baseline. This keeps timing alive under fatigue.
- During points, notice only one thing: do I land as the opponent hits? Leave every other thought alone.
Days 11 to 14: build the habit
- Two sets of ball drop cue on non-practice days.
- Light match play with phone filming two rallies from the side.
- Action check: compare day 1 to day 14. You should see less vertical bounce and a faster first step out of the landing.
Junior players: teach timing before power
For young players, the split step is the easiest way to improve court coverage without heavy strength training. Keep the language simple. Say float and land instead of jump. Use games where the coach calls a color or number at contact. Reward quiet feet and a still head more than raw speed. When juniors learn to land softly and go early, their strokes look cleaner because they are on time more often. For a phased junior pathway, see our 6-week change of direction plan.
Adult players: save the knees with soft landings
If you are returning to tennis or play a few times a week, protect your joints with better mechanics. Start with smaller hops. Land with heels light, not slamming. If you feel knee discomfort, shorten the hop and focus on rhythm. Good timing reduces the awkward lunges that cause most aches. Many adult players find that a lighter bodyweight shoe with solid lateral support improves confidence on landings. Try models that fit snugly through the midfoot so your feet do not slide inside the shoe during the push.
Doubles: two players, one rhythm
In doubles, the split step is a team sport. When your partner is striking the ball, you should be landing your split at their contact so you can shift together. This keeps the net player ready to intercept and the baseliner ready to cover the line. The most common error is the net player hopping late, then freezing as a return zips past. Practice with the coach calling hit every time your team contacts. Both players land on the call. You will feel your team’s shape tighten in two sessions. For patterns that pair with great timing, study winning doubles formations and plans.
How to coach it in five minutes
Coaches do not need complicated lectures to fix timing. Use this five-minute template at the start of a session:
- Demonstrate: show one silent rep with a soft, low hop and an early first step.
- Cue: say up on swing, down on hit while the player copies you.
- Constraint: use the ball drop cue so the landing is tied to a clear event.
- Review: film one rally and freeze the frame at opponent contact to check landing.
- Reinforce: praise soft landings and quick first steps, not big hops.
Repeat this mini-lesson twice a week. The split step will become the player’s default rather than a thing they remember only after errors.
Measuring progress without fancy tech
You can track improvement with three simple metrics:
- First-step time: place two cones three shoe-lengths apart. Land, then time how long it takes to cross the second cone with your lead foot. Record ten reps. Aim to reduce your average by small amounts over two weeks.
- Balance score: count how many landings in a twenty-ball rally keep your head level with no extra bounce. A partner can tally silently with fingers.
- Rally success under pressure: during a tiebreak in practice, note whether your landings are on time for the first three points. Early points reveal whether timing survives nerves.
Common questions, clear answers
Do I always split step? Yes, on every ball where the opponent’s contact decides your direction. That includes returns, volleys, passing shots, and lobs. The only times you might not are extended sprints when you are already fully committed and cannot unweight safely.
Should I land on my toes? Land on the balls of your feet with heels light. Pure tip-toe landings are unstable. Flat-footed landings are slow.
How do I split on clay versus hard courts? Clay rewards a slightly wider base and a smoother landing that flows into a controlled slide. Hard courts reward a crisp landing and a clean push. The timing rule does not change.
What about the serve? A mini split before you toss can help, but the core split step we are training relates to when your opponent hits.
Put it all together in a match
Before the warm-up, take thirty seconds by the back fence:
- Six shadow reps with the cue up on swing, down on hit
- Two reps of ball drop cue if a coach or partner is nearby
During the match, focus on one promise: I will land as my opponent hits the ball. That is your whole plan for the day. Every changeover, replay two points in your head and decide if you delivered on that promise. If not, restart the cue on the next return game. Keep it that simple.
Why this matters more than a new racquet
Players often buy a new frame or string to feel faster. That can help, but timing the ground connection is cheaper and more reliable. The split step is the master key for movement. It tunes your reaction, cleans your first step, and reduces the energy cost of every rally. When you find the rhythm, your tennis feels calmer. You will prepare earlier without rushing. You will defend farther without panic. You will attack sooner without forcing. That is the real win.
Conclusion: the quiet habit that wins you points
The split step is small, but it is not optional if you want to move like a confident player. Land as contact happens. Keep the hop low and the landing soft. Train it with simple cues and short daily reps. Film it once a week. Use the two-week plan to turn timing into a habit. Once the habit sticks, you will feel a new kind of calm on court. The ball will seem to arrive slower, not because it is slower, but because you are on time. That feeling is what better footwork delivers, and it starts with one light, well-timed hop.